")
Install & Set Up Cloudflare Tunnels on Linux (cloudflared)
Cloudflare Tunnels (cloudflared) is a free service provided through Cloudflare that can establish a connection (or a direct tunnel) from within your local network to Cloudflare (and thus the public web)
It’s a convenient and secure way to set up a bridge between a local server and a public facing domain without a bunch of config or coding, and its a much safer and easier-to-maintain alternative to opening a port on your router.
If you don’t have access to your router to open a port (or simply don’t want to) or need a much more professional, reliable, and better long term solution compared to other services like ngrok, then this is for you!
Setup
I am assuming you have a working installation of Linux on your hands… be it Debian/Ubuntu or Raspbian OS. This guide will work on most linux OS and works great on RPis too.
I also assume you have a domain purchased/ linked with Cloudflare.
Installing
First, you will need to install the latest cloudflared package:
This website is the official package repo for cloudflared. The following code sample is taken directly from there, and is suitable to use for “Any Debian Based Distribution.” We will be using apt to install, which will keep things tidy.
Any Debian Based Distro (Ubuntu)
# Add cloudflare gpg key
sudo mkdir -p --mode=0755 /usr/share/keyrings
curl -fsSL https://pkg.cloudflare.com/cloudflare-main.gpg | sudo tee /usr/share/keyrings/cloudflare-main.gpg >/dev/null

# Add this repo to your apt repositories
# Stable
echo 'deb [signed-by=/usr/share/keyrings/cloudflare-main.gpg] https://pkg.cloudflare.com/cloudflared any main' | sudo tee /etc/apt/sources.list.d/cloudflared.list
# Nightly
echo 'deb [signed-by=/usr/share/keyrings/cloudflare-main.gpg] https://next.pkg.cloudflare.com/cloudflared any main' | sudo tee /etc/apt/sources.list.d/cloudflared.list

# install cloudflared
sudo apt-get update && sudo apt-get install cloudflared
Log in
Next, you need to authenticate your Cloudflare account. This step is where you choose the domain to host things under… If you want a custom subdomain, ie my_app.example.com you should choose example.com from the list and the config for the subdomain will come in the next step.
Create the tunnel
Now, you can create your tunnel. To do so, run
cloudflared tunnel create somenamefortunnel

where you can name the tunnel whatever you would like. Usually something short and easy to identify is nice for future reference. Once you set this name, it can’t be changed, so choose carefully!
Keep note of the .json file path and also the tunnel’s id number (both highlighted on example)
Configuration
At this point we need to choose exactly what subdomain you want your server to be under, and where exactly that server is…
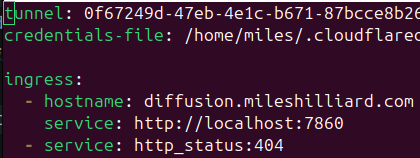
All configuration will be done in /etc/cloudflared/config.yml but you may have to create it first. Either create this file or open it in your editor of choice. You will want to fill the file with the following parameters.
The first two lines are responsible for the tunnel and the authentication. The first one is the ID of your tunnel. This is that number that you noted down when creating the tunnel. The second is for the actual path to the .json file where your credentials are stored. The tunnel creation command also yielded this file.
tunnel: tunnel_ID
credentials-file: that_cred_file.json

ingress:
  - hostname: my_domain.example.com
    service:  http://192.168.1.1:5000
  - service:  http_status:404
The ingress section is responsible for exactly where and how you want the incoming traffic to be handled. The hostname is responsible for where traffic will come in (the public facing side) and it should be something under the domain you chose when authenticating. The service is where your local app is being run. Likely this will be some IP. The final service is a 404 status page that appears as a fallback, and is required for the tunnel to function.
DNS Setup
We now need to make your new tunnel actually function under your domain name by setting the necessary DNS records. This can be done via the cloudflare DNS setting page, however I think it is easier and faster to use the CLI tool.
To create a DNS record for your hostname/service from the Configuration step, you will simply need to run this:
cloudflared tunnel route dns ID_OR_NAME_OF_UR_TUNNEL my_app.example.com
For example, a DNS record for mileshilliard.com (just replace the ID and host name)
cloudflared tunnel route dns ID_OR_NAME_OF_UR_TUNNEL demo.mileshilliard.com
Run the Tunnel
Config is finished, so all we have left to do is run the tunnel for the world to see!
First, ensure everything works by manually starting the tunnel with the following command:
cloudflared tunnel run ID_OR_NAME_OF_UR_TUNNEL
If everything checks out and it successfully starts, it is time to make it automatically start!
Run the following command to make it start as a systemd service. This means it will run independently and will start at boot:
cloudflared --config /path/to/config.yml service install
And boom, you are live!
0
Views