
Upgrade to Windows 11 Even If Your PC is "Unsupported" - Secure Boot is NOT Required!
Although I much prefer Linux, I do need Microsoft Windows for Fusion 360 along with a few other windows-only softwares.
Fusion 360 will be no longer supporting Windows 10, so I figured an upgrade was in store, however, I was met with some requirement deficiencies according to Microsoft:
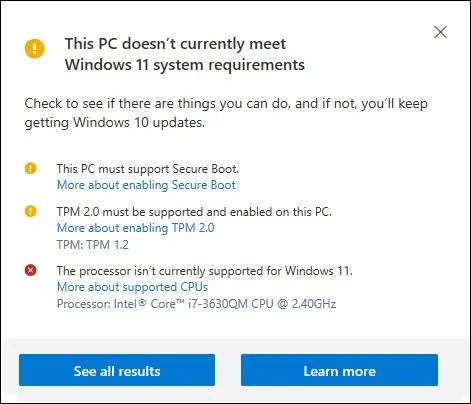
These requirements were instated just for Windows 11, as Windows 10 (and previous versions) still have no mention of these necessities.
Some of the requirements are easy enough to change in settings in your BIOS or your computer’s settings etc. however the biggest offender for me was the Secure Boot which I have intentionally disabled to dualboot my PC with Linux.
After a lot of trial and error, it seems that Windows really wants secure boot to be on, but I found a way around it. Without erasing all of your data, files, settings, etc.
How to bypass the “Requirements” - Secure Boot & More
As I said earlier, I have intentionally disabled Secure Boot which Windows 11 does not like. The most foolproof way to bypass this error along with other dependency issues is to remove them alltogether.
TL;DR: The way to do this is to use a Windows 10 ISO, but replace its install.wim or install.esd file from the one from a Windows 11 ISO
The idea is to trick your computer into thinking it is upgrading to Windows 10, but secretly install Windows 11 behind the scenes. This will bypass all dependency checks by Windows 11 and it will install it no matter what.
Download the ISO
We need both Windows 10 and Windows 11 ISO files. Make sure you have some free disk space to store these! They aren’t small files.
I recommend getting the ISO files for both Windows versions directly from the official Microsoft page.
- Windows 10 ISO: https://www.microsoft.com/software-download/windows10
- Windows 11 ISO: https://www.microsoft.com/software-download/windows11
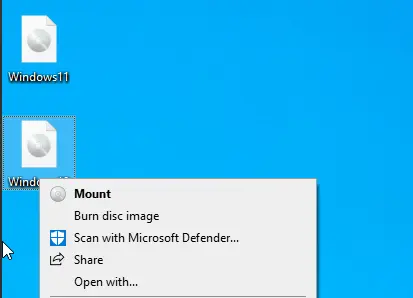
Once fully downloaded which will likely take a while, create a folder like Win11Bypass. The name is not important here.
Then right-click on the Windows 10 ISO, click Mount, and copy all the contents from the ISO file to the new folder you created
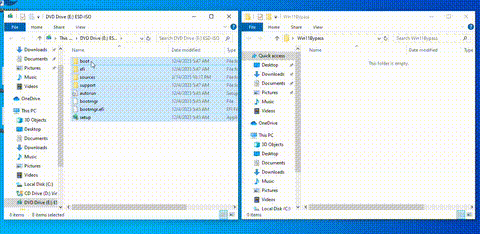
Now, we need to replace install.wim or install.esd (the file extension depends on the date and version you download) in the Win11Bypass folder with the Windows 11 ISO one. This file contains the instructions to install the Windows OS. By putting the Windows 11 file into the Windows 10 installer, it will simply install whatever install.wim file it sees, be it Windows 10 or 11!
- From the Windows 11 ISO grab the file:
[Mounted Windows 11 ISO]\sources\install.wim (or install.esd)
- Replace the same file inside:
C:\Win11UpgradeBypass\sources\
⚠️ If your Windows 11 ISO has install.esd but Windows 10 ISO uses install.wim, rename it accordingly!! (or vice versa).
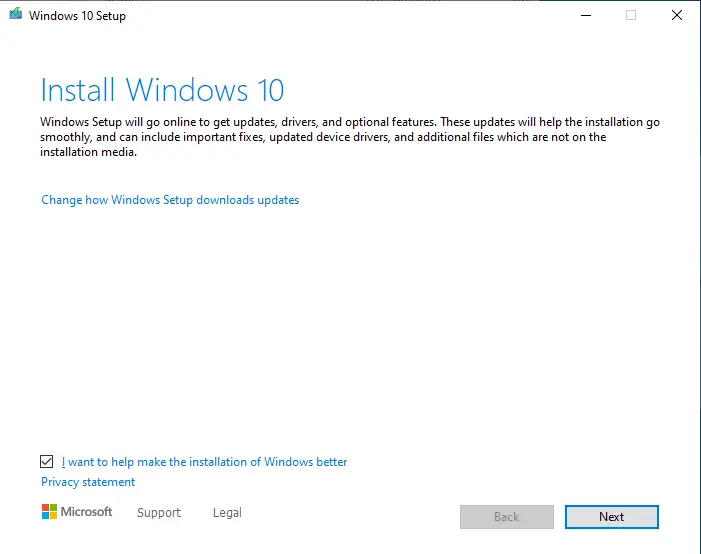
Now, whenever you are ready, simply run the installer setup.exe to upgrade to Windows 11 without deleting any of your files or settings, even if your PC doesn’t “meet the requirements to run Windows 11.”
If the installer says Windows 10, it is simply because we are re-using the Windows 10 installer wrapper, but in reality, we are installing Windows 11
C:\Win11UpgradeBypass\setup.exe
✅ It will think it’s a Windows 10 upgrade, so no Secure Boot/TPM/CPU checks
✅ But it installs real Windows 11
✅ All files & programs preserved
✅ Activation untouched
✅ Other OS will remain untouched
0
Views